Connecting to WiFi
To use the Material Plane sensor, there needs to be communication between the sensor and the VTT.
There are 2 ways to do this:
- WiFi: The sensor connects to your (2.4GHz) WiFi network. The VTT can connect directly to it, and you can access the webserver for configuration. Multiple VTT clients (for example, both the display and gm clients) can connect to the sensor.
- USB: The sensor connects over USB. WiFi setup is not required, but Material Companion is required for the connection. Only 1 VTT client can connect to the sensor (this should be the display client).
Connecting over WiFi is the most convenient, but might not be possible for your situation.
This page will only explain how to connect the sensor to a WiFi network. For connecting a VTT to the sensor, either using WiFi or USB, please check the 'VTT Configuration' section.
Connecting to WiFi Network
To connect to a WiFi network, the sensor needs to know the SSID (network name) and password of the network. There are 3 ways to do this:
Connect to WiFi Using Material Companion
You will need to install Material Companion.
- Connect the sensor to your computer using a USB-C cable
- Open Material Companion and navigate to the 'Sensor' sub-tab in the 'Material Plane' tab
- At the top, select the correct 'Sensor USB Port'.
- The production sensor will show up as 'COM## (Sensor)' or 'COM## (Sensor - Update) If it doesn't show up, try refreshing the USB ports.
If it shows up as 'COM## (Sensor - Update)' press the 'reset' button. After refreshing the USB ports it should show up as 'COM## (Sensor)'. - The DIY sensor will show up as 'COM##'. There may be multiple 'COM##' ports, see here if you are unsure which one is the correct one.
- The production sensor will show up as 'COM## (Sensor)' or 'COM## (Sensor - Update) If it doesn't show up, try refreshing the USB ports.
- In the 'Configuration' section, press the 'Read' button at the bottom and wait a few seconds. If the connection is successful all the configuration fields should be filled in.
- Press the 'Connect' button, which will open a popup.
- You can scan for nearby WiFi networks by pressing the 'Scan' button, this might take a while.
- Select the network you want the sensor to connect to, which will fill in the 'SSID' field with the SSID of the network. Alternatively, you can skip the scanning and directly fill in the SSID.
- Fill in the password of the network.
- Press 'Connect', the sensor will now restart and attempt to connect to the network.
Connect to WiFi Using the Webserver
If the sensor is not able to connect to a WiFi network, it will host its own network. By default it will be called 'materialsensor', however, if you have checked the name of the device the name might be different.
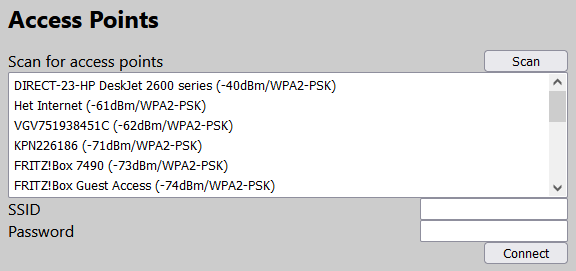
- Connect to the sensor's access point, the password is 'Material Foundry'. Wait for the connection to complete (this might take a while).
- In a browser, navigate to http://192.168.4.1.
- Once the webserver has loaded, navigate to the 'Network' tab.
- In the 'Access Points' section, you can scan for nearby WiFi networks by pressing the 'Scan' button, this might take a while.
- Select the network you want the sensor to connect to, which will fill in the 'SSID' field with the SSID of the network. Alternatively, you can skip the scanning and directly fill in the SSID.
- Fill in the password of the network.
- Press 'Connect', the sensor will now restart and attempt to connect to the network.
Connect to WiFi Using USB
You can connect to the sensor over the USB port, and send and receive data over serial.
You could use the built-in Arduino serial monitor (open the app, the serial monitor is the button at the top-righ with magnifyng lens icon) or a generic terminal emulator like YAT.
See the table below for the correct settings:
| Arduino Serial Monitor | Generic Terminal Emulator | |
|---|---|---|
| Baud Rate | 115200 | 115200 |
| Termination Character | Both NL & CR | NL & CR or <CR><LF> or \n\r |
| Data Bits | - | 8 |
| Parity | - | None |
| Stop Bits | - | 1 |
| Flow Control | - | None |
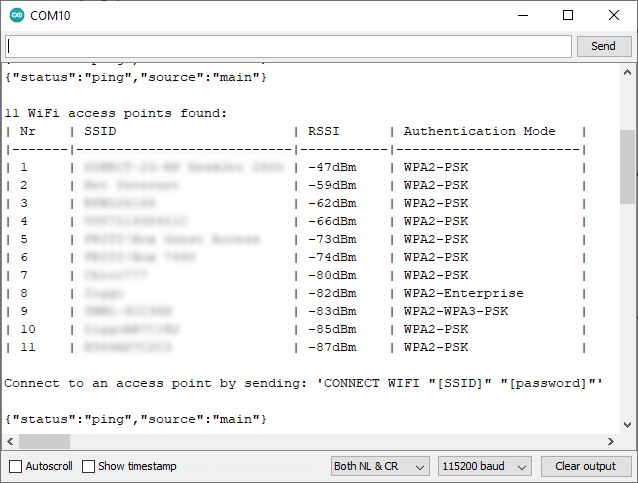
If the connection is succesfull, the sensor should output continuous data, for example:
{"status":"ping","source":"main"}
Which is transmitted every half second.
You might notice a very rapid output like the following:
{"status":"IR data","detectedPoints":1,"id":0,"command":0, ...}
This means that the sensor is detecting some infrared point. It would be helpful to make sure the sensor cannot see any infrared light, so either point it in another direction, or cover the front window.
To scan for WiFi Networks, send SCAN WIFI, after a few seconds a list of access points should show up, similar to the image below.
To connect to an access point, send:
CONNECT WIFI "[SSID]" "[password]"
Replace [SSID] and [password] with the actual SSID and password. Do not include the square brackets, but do include the quotation marks.
For example, to connect to an SSID named My SSID with password Password send:
CONNECT WIFI "My SSID" "Password"
 {}
{}
Sensor Address
To connect the sensor to the VTT, or to access the webserver you need to know the (IP) address of the sensor.
The sensor will have an IP address of the form x.x.x.x (for example: 192.168.1.10), and a DNS name which is the device name with .local appended (for example: materialsensor.local).
By default, the device name is materialsensor, but this can be changed in the network tab of the webserver, where you can also find the IP address.
Another way to find the device name and IP address is using Material Companion. Read the sensor configuration as described here (follow it up until point 4) and you can find the IP address and the name in the configuration fields.
Lastly, you can get the data using a terminal emulator. Configure the terminal emulator as described here.
When you send STATUS, a long list of settings is printed. Under the 'WiFi' section, look for 'IP Address' and 'Device Name'.
Finding the Correct USB Port
For updates over USB, you will need to find the correct USB port over which the update can take place.
Some devices, such as the production sensor and dock may show up as named devices in Material Companion or the Arduino IDE, but other will not. To figure out the correct port, you can try one of these methods:
Using Material Companion
- Open Material Companion and navigate to either the 'Sensor', 'Base' or 'Pen' sub-tab in the 'Material Plane' tab
- Make sure the device is disconnected, then press the 'refresh' button next to 'Sensor/Dock USB Port'
- Take note of which ports are currently selectable
- Connect the device, wait a few seconds, and press the 'refresh' button again
- A new port should show up, this is the port you're looking for
Using the Arduino IDE
- Open the Arduino IDE
- Make sure the device is disconnected, navigate to 'Tools' and take note of which ports are available under 'Port: xxx'
- Connect the device, wait a few seconds, and navigate to 'Tools' again (this won't work if you stay in the 'Tools' menu while connecting the device)
- A new port should show up, this is the port you're looking for
Using Device Manager (Windows)
- Open the start menu and search for 'Device Manager'
- Make sure the device is disconnected, navigate to 'Ports (COM & LPT)' and take note of which COM ports are available
- Connect the device, wait a few seconds, and Device Manager should update and show a new COM port, this is the port you're looking for