Connecting to the Sensor
It is necessary to establish a connection between the sensor and your Foundry client.
In the very least, the Foundry client that is displayed on the shared display must connect to the sensor.
Optionally, the gamemaster's client can also connect to the sensor. Doing this gives the gamemaster access to the sensor configuration, which might make configuration easier.
You will need to configure the connection for each client separately, and you will need to make sure that the display client is set as the 'Active User' in the Material Plane Configuration.
The connection between the Foundry client and sensor can be established over WiFi, or through the USB port (currently not functional).
WiFi Connection to Foundry
Before we continue, it is necessary to properly establish the difference between the Foundry server and any clients that connect to it, and the difference between secured and unsecured servers.
Client vs Server
Whenever you or your players use Foundry, there will be a single server. This server can take one of multiple forms:
- Part of the Foundry application, this is always the case if one user is running the Foundry application.
- A local server, for example, a computer in your office that runs a dedicated Foundry server.
- A remote server, for example, using the Forge, Molten Hosting, or another service that provides servers.
Anyone accessing Foundry, is doing so through a client. There's basically only 2 different client forms:
- Part of the Foundry application (the application is both a server and a client).
- Through a browser
Material Plane never talks directly to your Foundry server, it only connects to one or more clients.
For this reason, it does not matter how or where the server is hosted.
Secured vs Unsecured Servers
Most websites you visit on the internet are secured using SSL certificates, which allows safe, encrypted communication. Whether or not a website or server is secured can be identified by the lock to the left of your browsers navigation bar.
Most remote Foundry servers (such as servers hosted on the Forge or Molten Hosting) are secured.
Local Foundry servers are, by default, not secured. If yours is, you probably know this already, because you've had to configure it yourself.
For local gaming (so both the server and clients on your home network), there is no reason to secure the server, and to make connecting to the sensor easy, I would recommend that you do not secure it.
The reason this is important, is that the sensor cannot currently provide a secured connection. If your server is secured, the sensor is therefore not allowed (by your browser) to connect to the Foundry client. The result of this is that you will need to connect to the sensor through Material Companion, which can bridge this gap between the sensor and Foundry client.
Connection options
When connecting the sensor to the VTT over WiFi, you have 2 options:
- Direct Connection: The sensor connects directly to the VTT.
- Through Material Companion: The sensor connects to Material Companion, which then connects to the VTT.
The direct connection is preferable, but not always possible. For example, if your Foundry server is secured (see above).
This is where Material Companion comes into play: it connects to the client from the computer, which is allowed for secured servers. Material Companion can then connect to the sensor and pass all the data through.
Direct Connection
It is assumed that your sensor is already connected to your WiFi network.
 Make sure the sensor is switched on.
- Open the Material Plane Configuration.
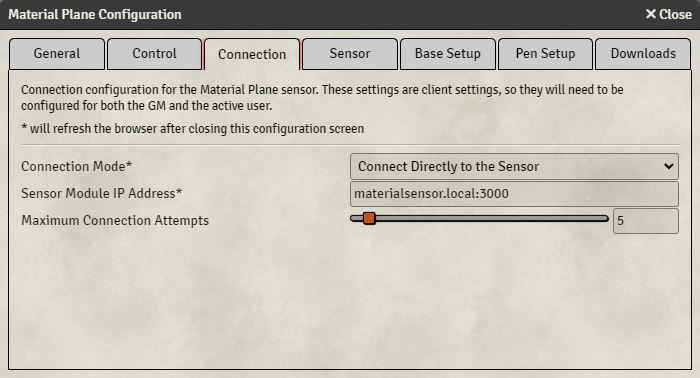
- Head over to the 'Connection' tab.
- Set the 'Connection Mode' to 'Connect Directly to the Sensor'.
- In the 'Sensor Module IP Address', fill in the sensor address/IP and port. By default, this is 'materialsensor.local:3000'. If this doesn't work, try figuring out the correct sensor address.
- Close the configuration screen, the client should refresh, if not, perform a manual refresh (press F5).
- If all goes well, you should see the 'Connected to sensor' popup message in Foundry. It can take a few seconds for this to appear.

Connection Through Material Companion
It is assumed that your sensor is already connected to your WiFi network.
 Start Material Companion.
- Open the Material Plane Configuration.
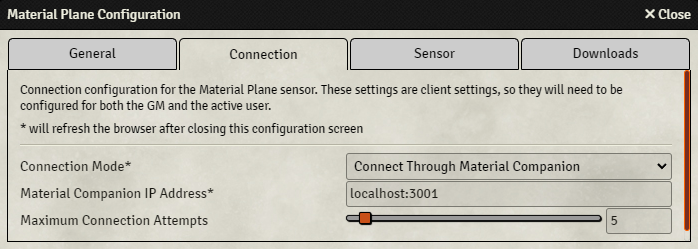
- Gead over to the 'Connection' tab.
- Set the 'Connection Mode' to 'Connect Through Material Companion'.
- In the 'Material Companion IP Address', fill in the Material Companion IP and port. By default, this is 'localhost:3001'.
- Close the configuration screen, the client should refresh, if not, perform a manual refresh (press F5).
- If all goes well, you should see the 'Connected to Material Companion' popup message in Foundry. It can take a few seconds for this to appear.

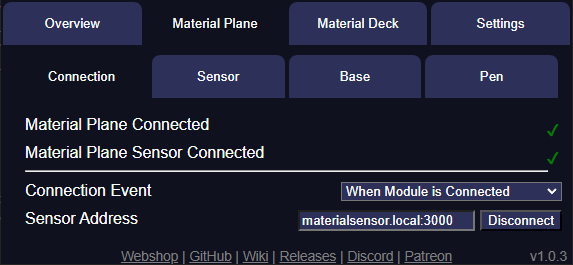 In Material Companion, head over to the 'Material Plane' tab.
- You should see a green tick next to 'Material Plane Connected".
- If the 'Material Plane Sensor Connected' tick is green, the sensor is already connected and you are done.
- Otherwise, in the 'Sensor Address', fill in the sensor address/IP and port. By default, this is 'materialsensor.local:3000'. If this doesn't work, try figuring out the correct sensor address.
- Press the 'Connect' button and wait a few seconds, hopefully the 'Material Plane Sensor Connected' tick turns green.
There are 3 different connection events which will decide when Material Companion will attempt to connect to the sensor:
- When module is connected: Material Companion will attempt to connect to the sensor when the module connects to Material Companion.
- When Material Companion starts: Material Companion will attempt to connect to the sensor when it starts, even if the module is not connected, or if Foundry is not running.
- Manually: You have to press the 'Connect'/'Disconnect' button to have Material Companion either connect or disconnect.
USB Connection to Foundry
Currently unsupported.