Module Configuration
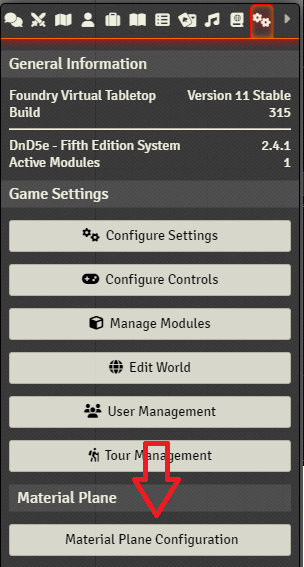
You can access the module configuration by opening the 'Game Settings' sidebar tab (on the right of the screen, cog icon), and clicking the 'Material Plane Configuration' button.
The configuration consists of multiple tabs:
General
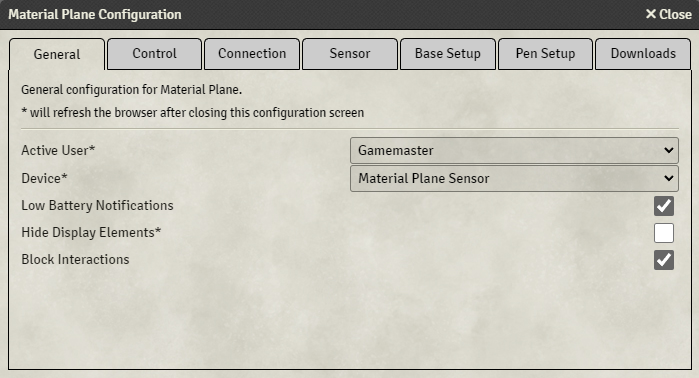
This tab is used for general settings for the module.
- Active User: Sets the active user for the module. This user will be the one displayed on the display.
-
Device: Sets the kind of device that is used for token tracking, either the 'Material Plane Sensor' or a 'Touch Screen'
-
Low Battery Notifications: Will pop up notifications if the battery of the sensor, base or pen is low
-
Hide Display Elements: Will hide all display elements (sidebar, buttons, scenes, etc). This can be toggles using the 'Ctrl' key
- Block Interactions: Will block canvas interactions if the Material Plane Configuration window is open. This will, for example, prevent tokens from being moved while adjusting sensor settings
Control
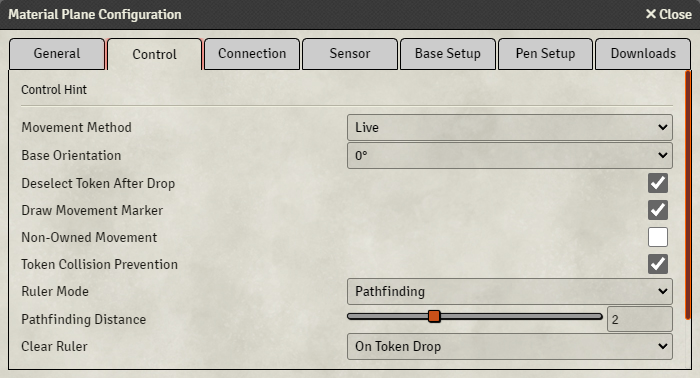
This tab is used for settings related to controlling tokens.
-
Movement Method: Material Plane offers 3 different movement methods:
- Live: When a token is being moved, its vision is updated constantly
- Foundry Default: When a token is being moved, its vision is only updated after the token is dropped/released
- Step-By-Step: When a token is being moved, it will update its position and vision every time it is moved onto a new grid space
-
Base Orientation: (Only relevant for base adapters or bases bigger than 1x1) Set the orientation of the bases, relative to the display. This allows the module to compensate for the center location of bigger tokens.
-
Deselect Token After Drop: Will deselect the token after it has been dropped/released
- Draw Movement Marker: Will draw a square on the grid to indicate where the token will end up if dropped/released. This marker will be green if this grid space is allowed, or it will turn red if the token cannot move there (for example, if it is blocked by a wall)
- Non-Owned Movement: Allows non-owned tokens to be moved. Vision of non-owned tokens will not be shown
- Token Collision Prevention: Whenever a token is dropped/released onto a grid space that is already occupied, the module will attempt to move the token to the nearest empty grid space along its movement path
- Ruler Mode: If enabled, the module will draw a ruler from the token's movement starting position to its current position. 4 modes are available:
- Disabled: Disable the ruler
- Straight Line: Draws a straight ruler from the token's starting position to its current position
- Follow Movement: Draws a ruler that (approximately) follows the token's path
- Pathfinding: Finds the shortest distance between the token's starting position and its current position. Requires routinglib to be installed and enabled
- Pathfinding Distance: ('Pathfinding' ruler mode only) Pathfinding is enabled for the last ruler segments to distances up to this value (in grid spaces). Segments at further distances will be locked. This prevents the pathfinding from always finding the shortest path, no matter how the token was previously moved. Set to 0 to disable.
- Clear Ruler: Sets when to clear the drawn ruler:
- On Token Drop: Clears the ruler when the token is dropped/released
- On New Movement: Ruler will stay visible after dropping a token. Clears the ruler when new movement is initiated
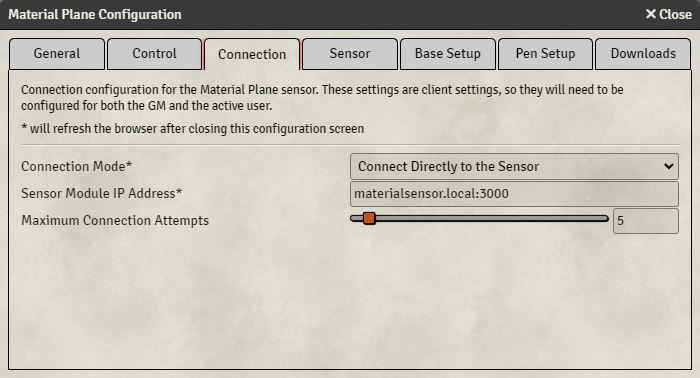
Connection
 This tab allows you to configure how the sensor will connect to Foundry.
Depending on your setup, you will either connect the sensor and Foundry directly, or through Material Companion. Please refer to the Sensor Configuration page for more info on the connection methods and why you would choose one or the other.
- Connection Mode: Sets how Foundry will try to connect to the sensor:
- Connect Directly to the Sensor: Foundry will attempt to connect directly to the sensor
- Connect Through Material Companion: Foundry will attempt to connect to Material Companion, which will then attempt to connect to the sensor
- Don't Connect: Foundry will not attempt to connect to the sensor
- Sensor Module IP Address: The address of the sensor. Find out the address here
- Material Companion IP Address: The IP address of Material Companion. Find out the IP address here
- Maximum Connection Attempt: Foundry will attempt to connect to either the sensor or Material Companion for this many times. After that it will stop trying, until it is refreshed
Sensor
This tab is used to configure the sensor settings.
Base Setup
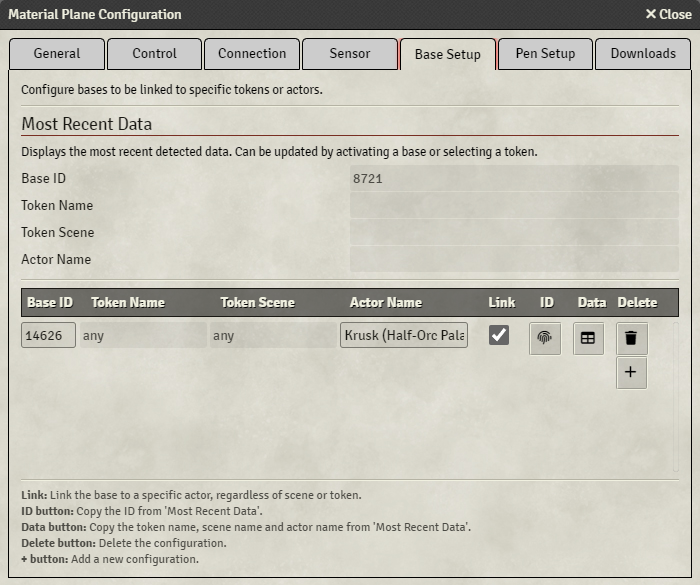 Each production base sends out a unique ID when it is active. This ID allows Foundry to know exactly which base was moved, and can therefore be used to link a base to a specific token or actor.
At the top, you'll find the data of the most recently moved base and selected token. Activating a different base, or selecting a different token will update this data.
At the bottom, you can configure the linking of tokens or actors to a base.
You can link a base to a specific token on a specific scene, or to a specific actor (which will be active for all scenes).
If a base is linked to a token or actor, but that token or actor is not on the current scene, the base will act like a normal unlinked base.
By pressing the '+' button, you can add a new rule. Each rule has the following settings:
- Base Id: The Id of the base that you want to link
- Token Name: The name of the token that you want to link (only required if 'Link Actor' is not enabled)
- Token Scene: The scene that you want this link to be active in (only required if 'Link Actor' is not enabled)
- Actor Name: The name of the actor that you want to link (only required if 'Link Actor' is enabled)
- Link (Actor): Enabling this will link the actor, instead of the token. This makes the rule active for all scenes
- ID: Pressing this button will take the most recently detected base Id, and fill this in
- Data: Pressing this button will take the token data of the most recent selected token, and fill this in
- Delete: Delete the rule
Basic linking will follow these steps:
- Activate the desired base
- Select the desired token
- Press the '+' button to add a new rule
- Press the 'ID' and 'Data' buttons to fill in the base id and token data
- (Optional) enable 'Link Actor'
You can also manually enter all the data.
Pen Setup
 The 'Pen Setup' tab allows you to configure some settings related to the pen.
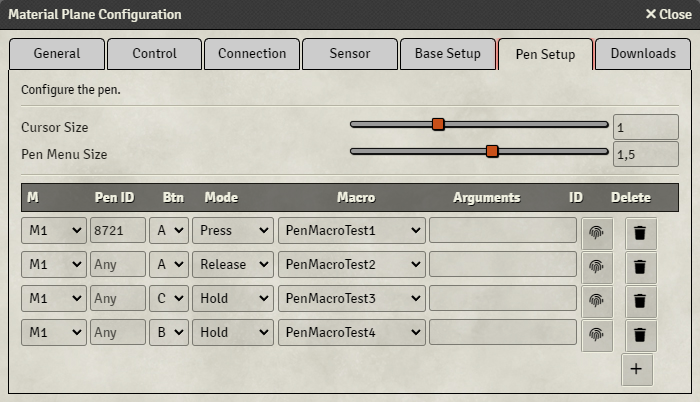
The top part of this tab has 2 settings:
- Cursor Size: Sets the cursor size of the pen
- Pen Menu Size: Sets the size of the pen menu
The bottom part of this tab can be used to assing macros to pen buttons by configuring rules. For info on how to execute these macros, please refer to this page.
By pressing the '+' button, you can add a new rule. Each rule has the following settings:
- M: The macro group to apply this rule to
- Pen Id: The pen id to apply this rule to, or 'any' if no id has been entered
- Btn: The button to press to call the macro
- Mode: The press mode to call the macro
- Press: Will call the macro if the button is pressed
- Hold: Will call the macro continuously while the button is held
- Release: Will call the macro if the button is released
- Macro: The macro to call
- Arguments: (Optional) macro arguments to use
- ID: Copy the id of the last pen that has been detected
- Delete: Delete the rule
Be careful with assigning macros to the C button, since this button will open the pen menu.
Downloads
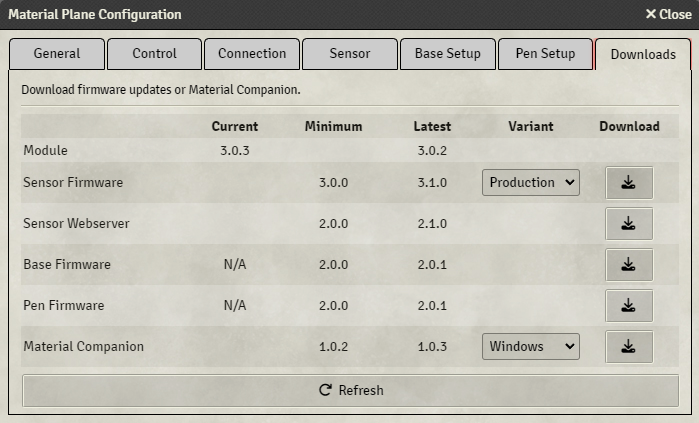 In the 'Downloads' tab you can download the various firmwares for the Material Plane hardware, and Material Companion.
For each component, you can see the current version, the minimum version (that works with this version of the module), and the latest version.
Select the desired 'variant' (if applicable) and press the 'Download' button to download the file.